
If you’re wondering how to initiate Mivi warranty claim for your Mivi Earphones warranty, don’t worry—we’ve got you covered with a simple 10-step guide. We’ll take you through each step in easy-to-understand language to make the process hassle-free.

Table of Contents
Mivi Warranty Claim: A Step by Step Guide to Hassle-Free Solutions
Initiating a Mivi warranty claim is a straightforward process. We’ll walk you through the necessary steps, making the entire procedure hassle-free.
Mivi offers a straightforward three-step process for submitting your claim
- Your Info
- Do it yourself
- Upload images

Follow the 10 Easy Step to Complete their Mivi warranty Claim
Step 1: Visit Mivi’s Official Website
Go to Mivi’s website at https://miviindia.zohodesk.in/portal/en/home.
Step 2: Find the “Home” Section
Explore the “Home” segment, typically located on the main page or in the top right corner. This area typically greets you with the main heading “Hello Mivian” and encompasses five customer support service sections prominently featured on the main home page: Claim Warranty, Track Your Ticket, Warranty Registration, Issues Related to Orders Placed on the Mivi Website, and Troubleshooting. These five sections comprehensively address various concerns related to Mivi products.
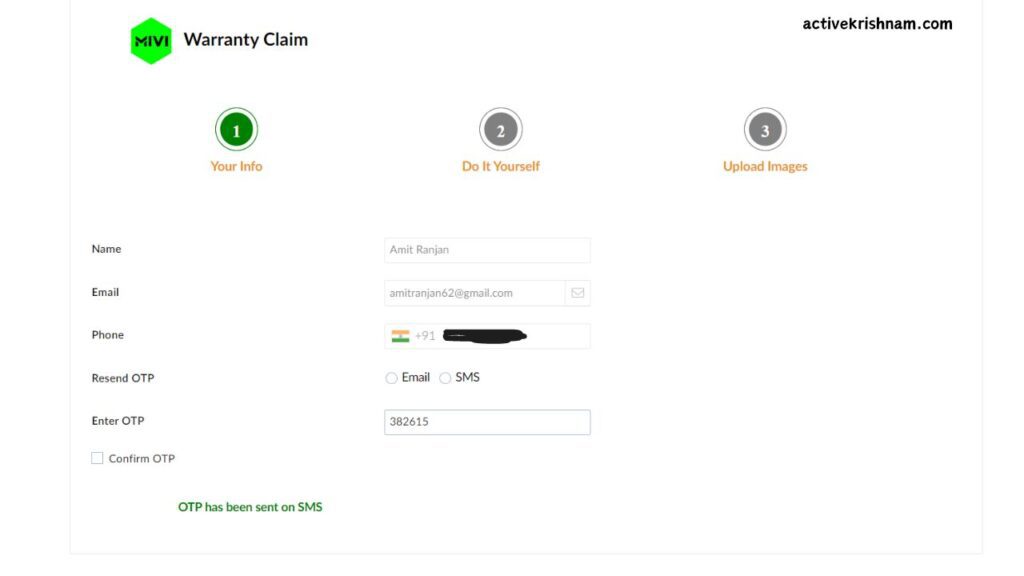
Step 3: Click on “Warranty Claim” and Complete “Your Info” Details
This Mivi warranty claim option is complete with the 03 sections first Your Info, second Do it yourself and the third Upload Images and video with sound describing your problem in a simple line. After finding “Warranty Claim,” you can complete your first section Your Info by filling out the form with your name, phone number, and email.
Step 4: Click on “Email or SMS” to Get an OTP (One-Time Password)
After completing the form, click “Send OTP to Email or SMS.” This enhances security on top of it. Receive an OTP on your registered phone number or in your mail inbox.
Step 5: Click on “Confirm OTP”
After you receive the OTP in your email inbox or as a text message on your phone, enter it in the provided box and click on “Confirm OTP” to proceed to the second step of the warranty claim process. This step helps verify your identity and ensures the security of the claim submission.
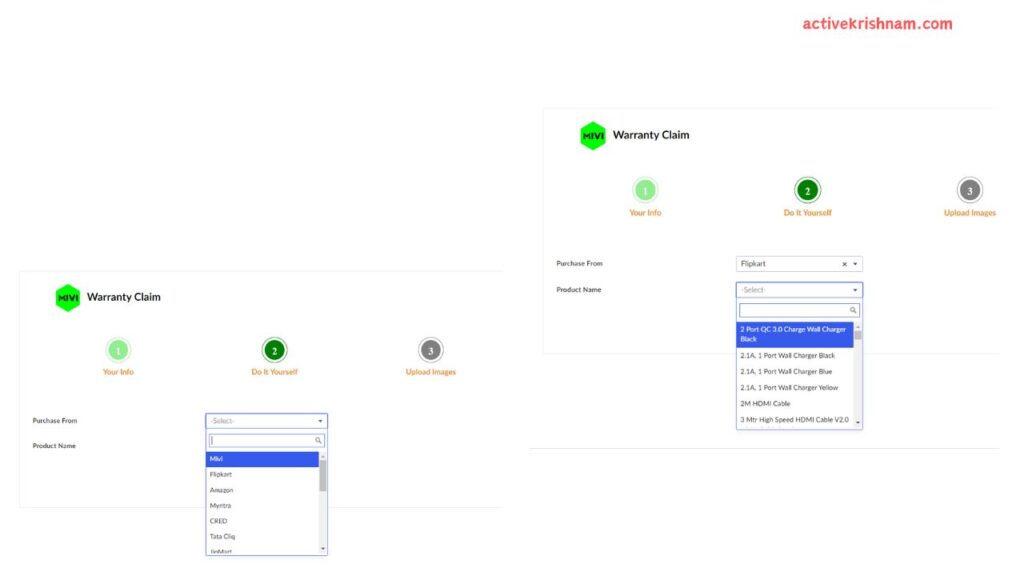
Step 6: Specify Where You Bought the Product and Product Name
Tell Mivi where you bought the product—whether it was from their website directly or through an approved retailer—in the “Purchase From” box. Furthermore, provide information regarding the product purchase, including pertinent facts like the date and any particular order information. This aids Mivi in comprehending the origin and details of your goods purchase.
Step 7: Select “Product Issue”
Common issues with Mivi products include sound problems on the left side, issues with the right side, and charging concerns, particularly with neckband-style devices. If you encounter sound imbalances or disruptions on one side, connectivity problems, or difficulties with charging your Mivi neckband, it is recommended to troubleshoot the specific issue. Refer to the product manual for guidance or reach out to Mivi’s customer support for assistance in resolving these particular product concerns. Addressing these issues promptly ensures an optimal performance and a satisfying user experience with your Mivi product.
NOTE:
- 1. Mivi warranty claim allow for a selection of up to two product issues.
- 2. This limitation ensures a focused and efficient resolution process.
- 3. Choose the most critical or relevant issues for a streamlined claims process.
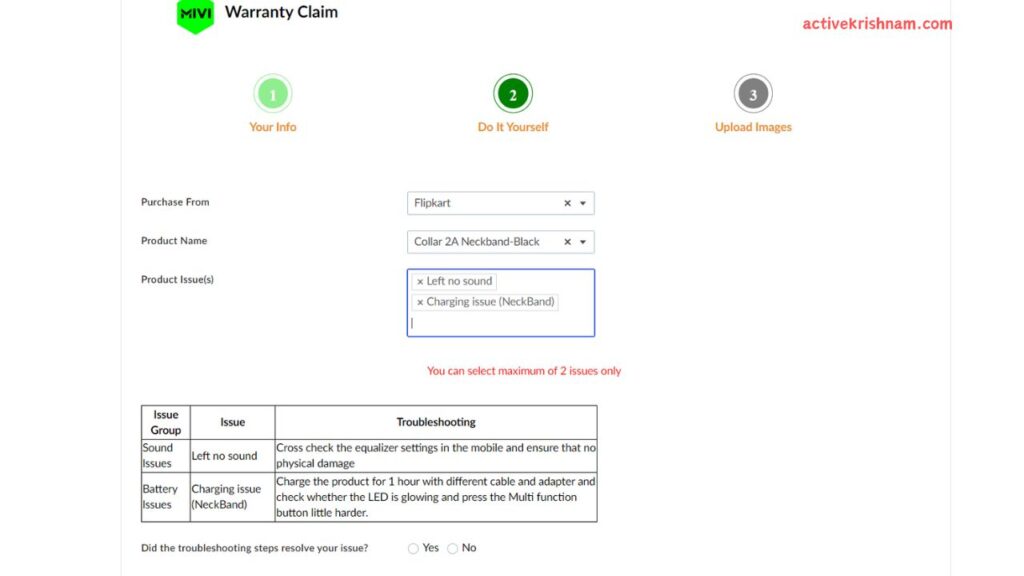
Step 8: Click on “NO”
Answer “NO” to the troubleshooting question (Did the troubleshooting steps resolve your issue? Yes or No). On selecting that option, you will be directed to the third section, which is the “Upload Images” stage.
Step 9: Fill Out “Upload Images” Form
Upload Invoice Copy:
When submitting a warranty claim with Mivi, please ensure to upload your invoice in either PNG or JPG format only.
Product Images:
Upload images of the product from all angles, including the left side, right side, and any areas showing defects or issues. This comprehensive visual documentation assists in providing a thorough understanding of the product’s condition during the warranty claim process with Mivi.
Upload Video of the Issue:
Include a video with sound that describes the issue you are facing with the Mivi product. This step allows you to provide a visual and auditory explanation, aiding in a clearer understanding of the problem during the warranty claim process.
Address to Pickup/Drop:
Please provide the address for pickup or drop-off when filing a warranty claim with Mivi. This information is crucial for ensuring a smooth process of handling your product.
NOTE: If your product has physical damage, Mivi will not be eligible for warranty coverage.

Step 10: Final Click on “Submit”
After submitting, a message will pop up, confirming your warranty claim was successful. It will say, “Mivi warranty added successfully.
Read More:
How to Register Fire Boltt warranty Registration Online (2023)
Conclusion:
Following these steps will help you easily navigate the Mivi warranty claim process. If you have any questions, Mivi’s customer support is there to help. Now you’re all set to enjoy a smooth and efficient warranty claim experience!
Remember, Mivi’s customer support is readily available to assist you with any questions or concerns you may have along the way. Your satisfaction is their priority.
We hope this guide has made the mivi warranty claim process hassle-free for you. Feel free to reach out to Mivi’s support team if needed, and enjoy your uninterrupted audio experience with your Mivi Earphones!
FAQs
How do I start the warranty claim process for my Mivi Earphones?
Begin by visiting Mivi’s official website at https://miviindia.zohodesk.in/portal/en/home. Navigate to the “Home” section and click on “Warranty Claim.” Follow the subsequent steps outlined in our guide.
Why do I need to send an OTP to my email or SMS on my registered contact number during the process?
The One-Time Password (OTP) adds an extra layer of security to ensure the authenticity of your warranty claim.
Can I claim warranty for Mivi Earphones purchased from any source?
Yes, you can claim warranty for Mivi Earphones purchased from Mivi’s official website, authorized retailers, or other legitimate sources. Specify the purchase location in the “Purchase From” section.